Customizing Document Emails (Pro and Agency)
Personalize the emails recipients receive when you send documents for signature. This guide covers customizing email subject and message, using dynamic variables, best practices, and plan requirements for email customization in BreezeDoc.
Prerequisites
- Plan: Pro ($19/month) or Agency ($49/month) plan required
- Account: Active BreezeDoc account
- Document: Document ready to send with recipients configured
- Access: On the "Send for Signature" page
What is Email Customization?
Email customization allows you to personalize the subject line and message body of emails sent to document recipients. This feature:
- Personalizes Communication – Add custom context, instructions, or branding to emails
- Improves Recognition – Recipients see familiar language and context
- Adds Instructions – Include specific guidance for signing the document
- Professional Branding – Match your company's communication style
- Dynamic Content – Use variables to automatically insert names, document titles, and links
- Better Response Rates – Personalized emails get more attention and faster responses
Default Email Content
If you don't customize the email, BreezeDoc sends a standard message:
- Default Subject: "[Your Name] has sent you a document to sign"
- Default Body: Standard message explaining the document is ready for signature
- Automatic Variables: Your name and document title are automatically included
Plan Requirements
Email Customization Availability
- Free Plan: ❌ Email customization NOT available
- Pro Plan ($19/month): ✅ Email customization available
- Agency Plan ($49/month): ✅ Email customization available
Upgrading for Email Customization
If you're on the Free plan and see the customization option greyed out:
- You'll see an upgrade prompt near the "Customize email" checkbox.
- Go to Settings ➜ Billing ➜ Plans.
- Select Pro ($19/month) or Agency ($49/month) plan.
- Complete payment setup.
- Email customization is available immediately after upgrade.
Customizing Document Emails
Step-by-Step Instructions
- Create or edit your document in BreezeDoc.
- Add fields and configure recipients.
- Click Send to proceed to the "Send for Signature" page.
- Scroll down past the recipients section.
- Find the Customize email checkbox.
- Check the Customize email box.
- Two fields appear:
- Subject: Email subject line field
-
Message: Email body text area
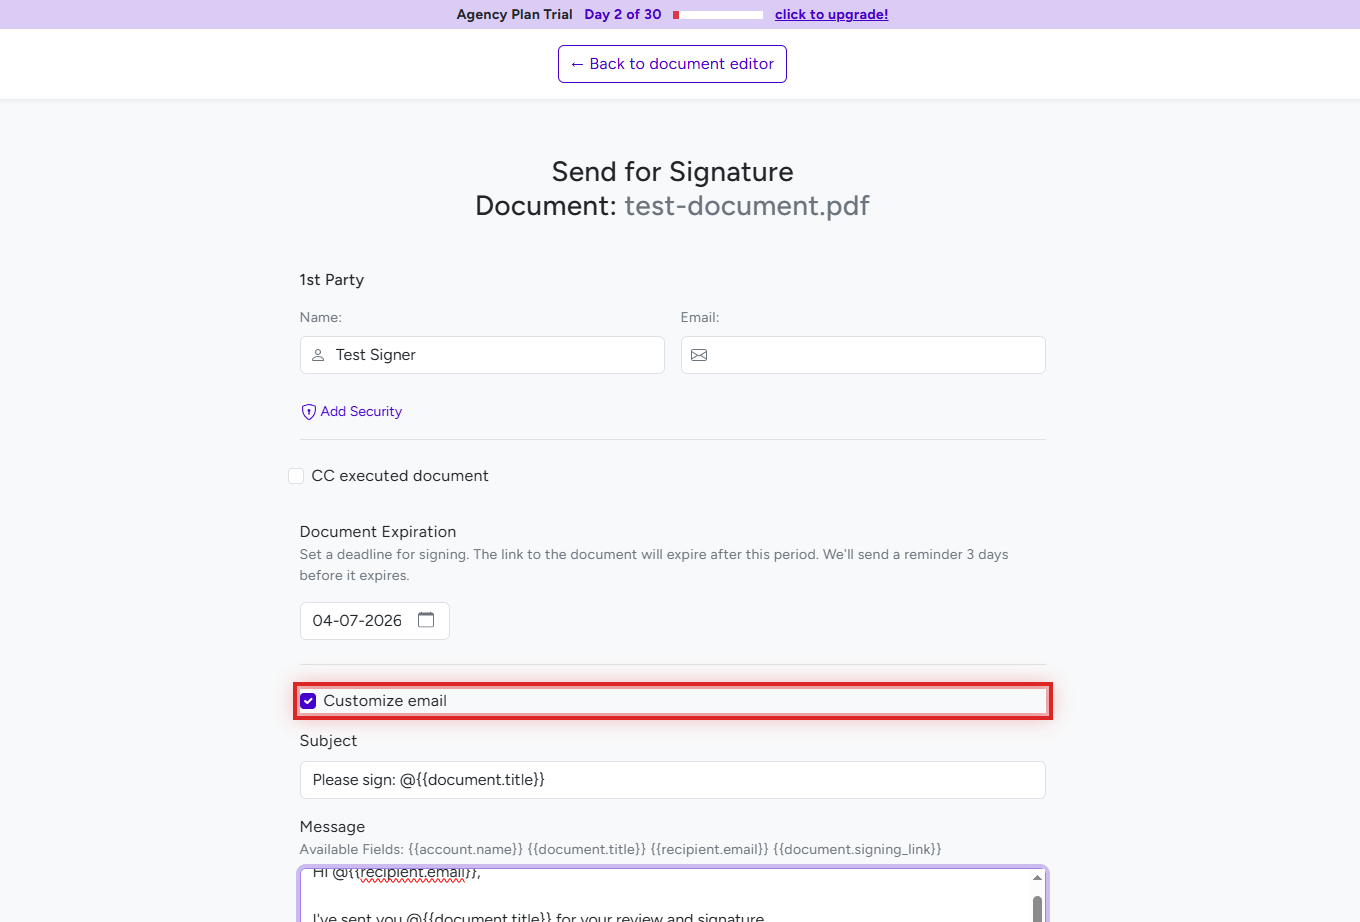
- Customize the subject line (e.g., "Please review and sign our partnership agreement").
- Customize the message body with your instructions and context.
- Use available dynamic variables to personalize the content (see below).
- Click Send for signature to send the document with your custom email.

Using Dynamic Variables
Available Template Variables
BreezeDoc provides dynamic variables that automatically populate with document-specific information:
- {{account.name}} – Your account name (document sender)
- {{document.title}} – The title of the document being sent
- {{recipient.email}} – The recipient's email address
- {{document.signing_link}} – Direct link to sign the document (not typically needed in message body as button is included)
How to Use Variables
Type the variable exactly as shown (including double curly braces) in your subject or message:
Example Subject:
{{account.name}} needs your signature on {{document.title}}
Result: "John Smith needs your signature on Partnership Agreement"
Example Message:
Hi {{recipient.email}},

I've sent you {{document.title}} for your review and signature.

Please review the document carefully and sign at your earliest convenience.

If you have any questions, feel free to reach out.

Best regards,
{{account.name}}
Variable Best Practices
- Case Sensitive: Variables must match exactly (lowercase with double curly braces)
- Exact Syntax: Use double curly braces {{ }}
- Test First: Send a test document to yourself to verify variables work
- Mix with Text: Combine variables with your custom text for personalization
Email Customization Examples
Example 1: Formal Business Agreement
Subject:
Action Required: Sign {{document.title}}
Message:
Dear {{recipient.email}},

Attached is {{document.title}} for your review and signature.

Please carefully review all sections and sign by the end of this week. If you have any questions or concerns about the agreement, please contact me before signing.

Click the button below to view and sign the document securely.

Thank you,
{{account.name}}
Example 2: Casual Client Contract
Subject:
Quick signature needed for {{document.title}}
Message:
Hi there!

Thanks for working with us! I've sent over {{document.title}} for your signature.

This should only take a minute to review and sign. Just click the button below to get started.

Let me know if you have any questions!

Cheers,
{{account.name}}
Example 3: Document with Special Instructions
Subject:
{{account.name}}: Please review {{document.title}} before signing
Message:
Hello,

I'm sending you {{document.title}} for your signature.

IMPORTANT: Before signing, please:
1. Review pages 3-5 carefully (payment terms)
2. Initial all pages as indicated
3. Sign the final signature field

If you have questions about any section, please call me at (555) 123-4567 before signing.

Click below to access the secure document:

Best regards,
{{account.name}}
Email Customization Best Practices
Subject Line Best Practices
- Clear and Concise: Keep subject under 60 characters for mobile readability
- Action-Oriented: Use words like "Sign", "Review", "Action Required"
- Include Document Name: Use {{document.title}} variable for context
- Avoid Spam Triggers: Don't use all caps, excessive punctuation, or spam words
- Professional Tone: Match your brand and relationship with recipient
Message Body Best Practices
- Start with Greeting: Personalize with recipient name or email
- Provide Context: Explain what the document is and why it needs signing
- Add Instructions: Include any special steps or requirements
- Set Expectations: Mention deadlines or timeframes
- Offer Help: Include contact information for questions
- Professional Closing: End with your name using {{account.name}}
- Keep It Concise: Recipients prefer shorter, scannable emails
Formatting Tips
- Use line breaks for readability (press Enter between paragraphs)
- Use numbered or bulleted lists for multi-step instructions
- Avoid long paragraphs (2-3 sentences max)
- Use capitals sparingly for emphasis, not entire sentences
- Proofread for typos and clarity before sending
Troubleshooting
Issue: Customize email checkbox is greyed out
Fix: Email customization requires Pro or Agency plan. Verify your plan in Settings ➜ Billing. If on Free plan, you'll see an upgrade prompt. Click to upgrade to Pro ($19/month) or Agency ($49/month). Email customization is available immediately after upgrade.
Issue: Variables showing as {{account.name}} instead of actual name
Fix: Verify you're using the exact variable syntax with @ symbol and double curly braces. Variables are case-sensitive – use lowercase. Check for typos in variable names. Variables only populate in the actual sent email, not in the text editor preview. Send a test document to yourself to verify variables work correctly.
Issue: Custom email not saving or reverting to default
Fix: Ensure you check the "Customize email" checkbox before editing. Both Subject and Message fields are required – fill out both fields. Click Send for signature to save and send with custom email. If issue persists, try clearing browser cache or using a different browser.
Issue: Recipients not receiving customized email
Fix: Verify you clicked Send for signature after customizing the email. Check that recipient email addresses are correct. Ask recipients to check spam/junk folders. Customization only applies to new emails sent after you save – previously sent documents use the old email content.
Issue: Want different email content for different recipients
Fix: Currently, BreezeDoc uses the same customized email for all recipients of a document. To send different messages to different recipients, create separate documents for each recipient or send documents individually with different custom emails each time.
FAQ
Q: Is email customization available on the Free plan?
A: No, email customization requires a Pro ($19/month) or Agency ($49/month) plan. Free plan users see default email content and can upgrade to access customization.
Q: Can I save email templates to reuse?
A: BreezeDoc saves the last custom email you used on a document. When you edit and resend a document, the previous custom email is pre-filled. However, there is no separate template library for email messages. Consider saving your common email templates in a text file for easy copy-paste.
Q: Can I use HTML formatting in custom emails?
A: No, custom email messages are plain text only. You cannot use HTML tags, bold, italics, or colors. Use line breaks, spacing, and capital letters for emphasis instead.
Q: Will my custom email work for reminder emails too?
A: No, the custom email content only applies to the initial document notification email. Automated reminder emails use BreezeDoc's standard reminder template and cannot be customized.
Q: Can recipients see my custom email in the document itself?
A: No, the custom email is only visible in the email notification sent to recipients. The document itself and signing page do not display the custom email content.
Q: What happens if I misspell a variable name?
A: If a variable is misspelled or doesn't exist, it will appear as plain text in the email (e.g., "@{{account.nam}}" instead of your name). Always double-check variable spelling before sending. Test by sending to yourself first.
Need more help? Contact our support team – we are here to help!